Akai MPK Mini MKII and Ableton Live Use as a Control Surface
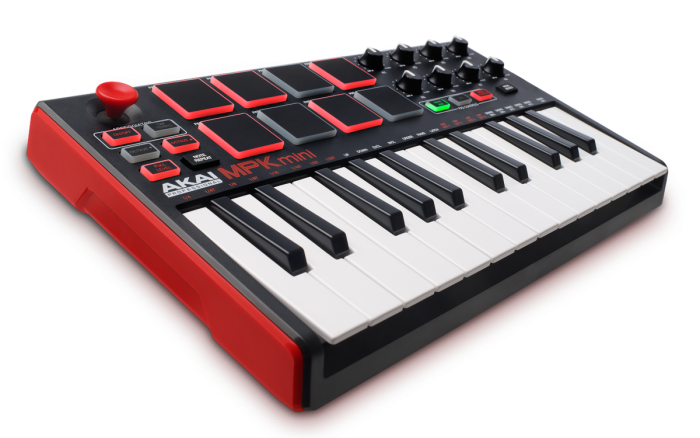
I recently purchased the Akai MPK Mini MKII for use with Ableton Live 9. There is some support for the original MPK Mini in Live, but everything did not work as advertised for the MKII version. A little Google Fu revealed that there was a User Remote Script created for the original MPK by Matthew Adams and modified by mothergarage.blogspot.com.
This script added a lot of functionality for the MPK Mini but did not work out of the box for the MKII since the preset format had been changed. I found that there were lots of clues in the documentation about how the presets needed to be setup so I have reverse engineered them and created a set for the MPK Mini MKII here. Continue past the break if you want to know the nuts and bolts of how it works.
What's in the file
There are two folders in the zip file:
- MPKmini2 - contains the userconfig.txt file
- MPKmini2 Presets - contains the four presets to be loaded into the MPK Mini MKII and screenshots of the actual settings
Copy the "MPKmini2" folder into the the User Remote Scripts folder for your desired Ableton Live version. This step must be completed for every version of Live that you want to use the script.
Windows:
Users\[YourUserName]\App Data\Roaming\Ableton\[LiveVersion]\Preferences\User Remote ScriptsMac:
Macintosh HD>Users>[YourUserName]>Library>Preferences>Ableton>[LiveVersion]>User Remote Scripts
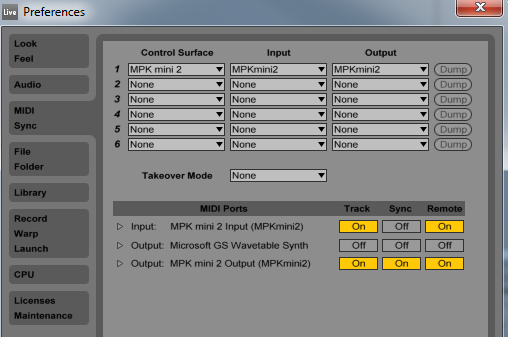
Select the MPKII as a Control Surface in the Ableton settings as shown below.
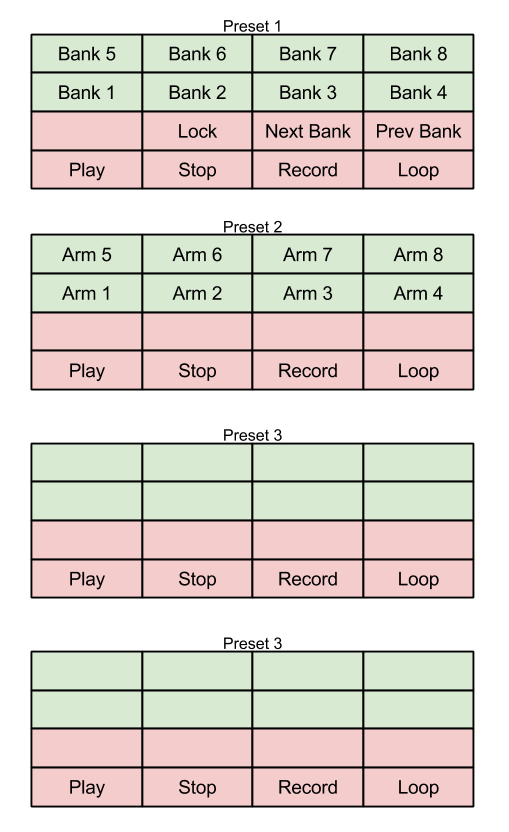
Using the Ableton MPK Mini MKII Editor (found here) load the files in the "MPKmini2 Presets" directory into the appropriate program. I have also included screen shots of the settings in each preset to make it easier to customize or recreate them if needed.
Important
How the Script Works
The presets are selected by pressing "PROG SELECT" and one of the top drum pads at the same time. Holding "PROG SELECT" will light up the current preset pad. The pad light will flash three times before going solid when a new preset is selected.
Preset 1 (Drumrack + Macros)
The padbanks will control a drum rack if one is selected and are configured for notes C1 and upward.
The encoders will control the currently selected device (indicated by a blue hand in the device header).
Selecting "CC" under Pad Controls will put you in "Control Change" mode
When on Bank B (Red):
- Pads 1-4 control playback/recording and are the same in all four presets.
- Pad 5 will "lock" the the macro control to the currently selected device.
- Pad 6 & 7 (next/prev) will move between macro banks 1-8 for the selected device.
When on Bank A (Green):
- Pads 1-8 will switch between macro banks 1-8 for the selected device.
Preset 2 (Volume + Arm)
The padbanks are configured for notes C2 and upward.
The encoders will control the volume of tracks 1-8.
After selecting "CC" under Pad Controls
When on Bank B (Red):
- Pads 1-4 control playback/recording.
When on Bank A (Green):
- Pads 1-8 will arm tracks 1-8.
Preset 3 (Send 1)
The padbanks are configured for notes C3 and upward.
The encoders will control Send 1 of tracks 1-8.
After selecting "CC" under Pad Controls
When on Bank B (Red):
- Pads 1-4 control playback/recording.
Preset 4 (Send 2)
The padbanks are configured for notes C4 and upward.
The encoders will control Send 2 of tracks 1-8.
After selecting "CC" under Pad Controls
When on Bank B (Red):
- Pads 1-4 control playback/recording.
Please click the following Amazon.com link to support this website if you plan to purchase the Akai Professional MPK MINI MKII.
blog comments powered by Disqus